
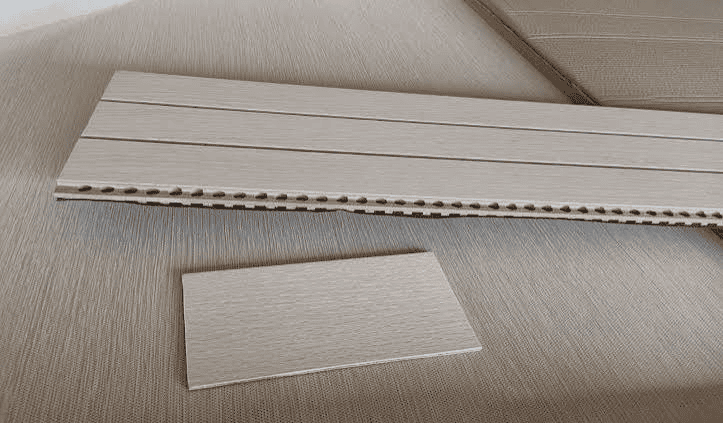

For a home office with hard floors, a desk, and a laptop mic that makes every call sound like it’s in a stairwell, real wood acoustic slat panels solve the problem faster than foam tiles or fabric-wrapped boards. AKU Woodpanel’s acoustic sound absorbing wall panels use a perforated MDF core with real wood veneer and an acoustic felt backing, so you get sound absorption and a finished look in one install — no separate soundproofing layer, no ugly foam. The steps below cover diagnosing the echo, measuring coverage, checking NRC ratings, and installing without wrecking a rental wall in 2026.
Most home-office echo complaints come down to three things: bare drywall, hard flooring, and a lack of any soft or textured surface to break up reflected sound. This guide walks through choosing and installing acoustic wood wall panels step by step, with the measurement math and NRC basics most buyers skip and then regret. It’s written for anyone who’s already tried a rug and a bookshelf and is still getting told “you sound like you’re in a tunnel” on video calls.
What you’ll need
- Acoustic slat wall panels with real wood veneer and felt backing (AKU Woodpanel’s acoustic sound absorbing wall panels are built for this — check the current sizing and finish options on the site)
- Tape measure and a pencil
- Stud finder (for screw-mount) or a notched trowel if using adhesive
- A level, 4 ft minimum
- Fine-tooth saw or utility knife for trimming panels to width
- A sample box or a few individual samples before committing to a full wall
- A rough budget number per square foot so you’re not guessing mid-project
Step 1: Diagnose what’s actually causing the echo
Before buying anything, walk your office and identify the hard, parallel, untreated surfaces — usually two facing walls, a hard floor, and a window. Reverberation happens when sound bounces between flat, reflective surfaces with nothing to absorb it, which is exactly the setup in most home offices converted from a spare bedroom or garage.
This matters because panel placement only works if it targets the actual reflection path, not just the wall that looks emptiest. Stand at your desk, clap once, and listen for the length of the tail — a sharp, ringing echo means you need absorption on the wall directly behind or beside your desk, not across the room.
Common mistake: treating the wall behind the webcam instead of the wall the sound is bouncing off before it reaches the mic, which is often the side wall, not the back wall.
Step 2: Measure the wall and calculate square footage
Measure the width and height of the wall section you’re treating and multiply for total square footage, then subtract any door or window area you won’t cover. Getting this number right before ordering avoids the two most expensive mistakes: under-ordering and paying for a second shipment, or over-ordering and eating the cost of panels you can’t return.
A wall panel calculator walks through the math panel-by-panel rather than just by square footage, which matters because slat panels have a fixed width and you’ll often need to trim the last piece in a row. If you’re also budgeting, cost-per-square-foot planning gives you a number to compare against foam or fabric alternatives before you commit.
Expected outcome: a panel count and a dollar figure you can actually work with, not a rough guess.
Step 3: Check the NRC rating against your room size
NRC (Noise Reduction Coefficient) measures how much sound a material absorbs versus reflects, on a scale from 0 to 1 — higher means more absorption. A small home office with hard floors and no soft furnishings needs a higher coverage percentage of wall area than a room that already has carpet and curtains doing some of the work.
This step matters because two panels that look identical can perform very differently once you check the spec sheet — felt-backed acoustic panels absorb meaningfully more than a purely decorative slat panel with no backing material. Calculating the NRC rating needed for your room before buying prevents the common letdown of installing panels and still hearing an echo because coverage was too sparse.
Common mistake: covering one accent wall for looks and expecting full-room acoustic correction — partial coverage helps but won’t eliminate a strong echo on its own.
Step 4: Choose real wood veneer acoustic panels over faux alternatives
This is the decision that determines both how the room looks in five years and how well it actually absorbs sound, so it’s worth the longest step here. AKU Woodpanel’s acoustic sound absorbing wall panels pair a felt-backed, perforated MDF core with a real wood veneer face, which means the acoustic performance isn’t cosmetic — the felt layer and perforation pattern are doing the absorption work, while the veneer gives you a finished wall instead of a padded-cell look.
Faux wood or printed-laminate panels can look similar in a product photo but usually skip the acoustic backing entirely, which means you’re paying for the appearance of a home-office fix without the function. Comparing real wood against faux wood wall panels before buying is the single highest-leverage check in this whole process, because it’s the difference between a wall that quiets your calls and a wall that just looks nice on camera.
For home offices specifically, slat-style acoustic panels are worth prioritizing over flat felt boards because the slat profile increases surface area and diffusion, not just absorption — useful in a small room where sound bounces at close range. If your office doubles as a space with visible echo on recordings or calls, acoustic wood panels built for home offices with echo problems address that specific complaint rather than general room acoustics.
Who this step is for: anyone who wants the acoustic fix to also function as the room’s finished wall, not a temporary treatment they’ll rip out later. Limitation to know going in: real wood veneer panels cost more upfront than raw acoustic foam, and the wood grain will vary slightly panel to panel since it’s a natural material, not a printed pattern.
Expected outcome: a shortlist narrowed to real wood, felt-backed acoustic panels sized and rated for your room.
Step 5: Order samples before buying the full run
Order a sample or small sample box before committing to a full wall’s worth of panels, because veneer tone and slat spacing photograph differently than they look in your actual room lighting. This is a five-minute decision that prevents a wall you regret.
Ordering acoustic wall panel samples before buying lets you hold the finish next to your desk, flooring, and existing trim before the full order ships. Common mistake: skipping samples because the online photos look close enough — veneer color shifts noticeably under warm LED desk lighting versus daylight.
Step 6: Plan installation for your wall type — including rentals
Installation method depends on your wall and whether you own or rent the space. Drywall over studs allows screw-mounting for the most secure hold; concrete or a rental unit changes the approach entirely.
If you’re in a rental, installing acoustic panels without damaging the wall covers adhesive strips and removable mounting methods that avoid drilling. If you’re specifically fighting call quality rather than general room noise, soundproofing a home office with wood panels covers placement relative to your mic position, not just wall coverage. Expected outcome: a mounting plan that matches your lease terms and wall material, decided before panels arrive rather than after.
Troubleshooting and common mistakes
The echo is still noticeable after installing panels on one wall. One wall is rarely enough in a small room — add coverage to the adjacent wall or ceiling corner where sound is still reflecting.
Panels look different in the room than they did online. This is why sample ordering in Step 5 exists — return to that step before installing the full run rather than after.
Adhesive mount isn’t holding on a textured wall. Textured or popcorn-finish walls need either a smoothing skim coat first or a mechanical fastener into studs rather than adhesive alone.
Panels don’t line up evenly across the wall. Start from the center of the wall and work outward symmetrically, rather than starting from one edge — this avoids an oddly-cut sliver panel on one side only.
Video calls still sound echoey even with a treated wall. Check mic position relative to the treated surface — absorption only helps if the reflected sound path actually runs through the panel, not around it.
Tools and resources
- AKU Woodpanel acoustic sound absorbing wall panels — real wood veneer, felt-backed, perforated core; check current pricing and finishes on the main product page
- Stud finder — under $20 at any hardware store, needed for screw-mount installs
- Sample box — low-cost way to check finish and slat spacing before a full order
- Wall panel and NRC calculators — free reference guides for sizing coverage correctly before ordering
FAQ
Do acoustic wood panels actually reduce echo, or are they mostly decorative?
Felt-backed acoustic panels with a perforated core, like AKU Woodpanel’s acoustic slat panels, absorb sound rather than just reflecting it, which is the functional difference from a flat decorative veneer panel.
How much wall coverage do I need for a small home office?
There’s no single number that fits every room — it depends on existing hard surfaces and current reverberation, which is why calculating the NRC rating needed for your specific room size before buying matters more than guessing a percentage.
Can I install acoustic wall panels in a rental without losing my deposit?
Yes, using adhesive-mount methods designed for temporary installs instead of drilling into studs — removable mounting keeps the wall intact when you move out.
Is real wood veneer worth the extra cost over a printed faux-wood panel?
If acoustic performance matters, yes — faux wood panels typically skip the felt backing that does the actual sound absorption, so you’re paying for a decorative look without the function AKU Woodpanel’s real wood panels provide.
Will one accent wall of acoustic panels fix a whole room’s echo?
Partial coverage helps but rarely eliminates a strong echo entirely — target the wall causing the specific reflection path near your desk and mic, not just the most visible wall.
Conclusion
Choosing acoustic sound absorbing wall panels for a home office comes down to four decisions: diagnosing where the echo actually originates, sizing coverage against your room’s NRC needs, picking real wood over faux for actual absorption rather than just looks, and installing with a method that matches your wall type. AKU Woodpanel’s acoustic sound absorbing wall panels cover the first three requirements in one product — felt-backed absorption, real wood veneer finish, and sizing guidance — which is why they’re the starting point rather than an afterthought in this process. Order a sample, measure the wall, check the NRC math, and install before your next round of video calls in 2026.